Blog

  • Diablo 4 Set Items (Charms & Bonuses) & Talisman System Guide

    Diablo 4 Set Items (Charms & Bonuses) & Talisman System Guide

    Diablo 4’s Lord of Hatred expansion has revolutionized endgame progression with the introduction of set items, reimagined through a brand-new Talisman System that blends the best of Diablo 2’s charm mechanics and Diablo 3’s set bonuses. Unlike traditional set gear that competes for armor or weapon slots, Diablo 4’s set items exist as socketable charms, offering a new layer of character customization without locking players into rigid builds. This guide breaks down everything you need to know about set Diablo 4 Items (charms and their bonuses) and the Talisman System, from unlocking the system to optimizing your charm loadouts for endgame success.

    What Are Set Items in Diablo 4? A Modern Reimagining

    Gone are the days of green set armor pieces that force you to sacrifice unique or legendary gear. In Diablo 4, set items take the form of charms-small, socketable items that grant individual affixes and powerful set bonuses when equipped in the Talisman interface.

    These set charms are distinct from standard charms, which offer basic stat boosts like resistance increases or skill rank bonuses. Set charms belong to specific charm sets, and equipping multiple charms from the same set unlocks tiered bonuses that alter gameplay mechanics, not just raw damage numbers.

    Blizzard’s design avoids Diablo 3’s biggest pitfall: massive, mandatory damage multipliers that made non-set builds unviable. Instead, Diablo 4’s set bonuses focus on playstyle changes, allowing for creativity and hybrid builds that complement your core gear choices.

    Set charms come in multiple rarities, including magic, rare, legendary, unique, and the new set rarity. Each charm has two affix rolls, which can include skill rank increases, experience boosts, resistance enhancements, or crafting material drop rates-adding even more depth to customization.

    The Talisman System: Foundation of Set Item Progression

    The Talisman System is the backbone of set item progression in Diablo 4, unlocked during the Lord of Hatred campaign. If you’ve completed the campaign once, you can skip it in new seasons and unlock the Talisman immediately for your character.

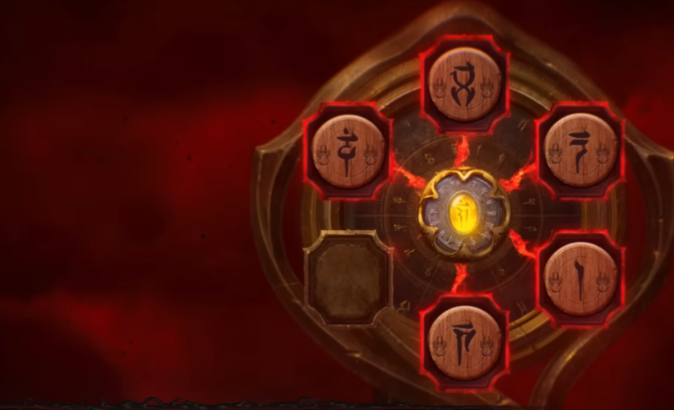
    Accessed through a dedicated tab in your inventory, the Talisman features seven sockets: one central Horadric Seal and six outer charm slots. This separate interface means your set charms never compete with your main gear, letting you keep your favorite unique or legendary items while still benefiting from set bonuses.

    Charms only activate their effects when socketed into the Talisman-they serve no purpose if left in your inventory. This design eliminates inventory clutter and makes charm management a strategic choice, not a storage puzzle.

    The system’s flexibility is its greatest strength. You can mix and match set charms from different sets, combine them with legendary or unique charms, or focus on a single set for maximum synergy. This freedom encourages build experimentation and lets you tailor your Talisman to your playstyle.

    Horadric Seals: The Heart of the Talisman

    At the center of every Talisman is the Horadric Seal-a foundational item that dictates your charm setup’s potential. The only seal revealed so far, the Horadric Seal of Honor, offers a glimpse of how these items shape your progression.

    Seals determine three key things: the number of charm sockets unlocked, fixed stat bonuses, and set affinities that enhance specific charm families. For example, the Horadric Seal of Honor unlocks five of the six possible charm sockets and grants a nearly 50% total armor bonus, along with the ability to equip two unique charms simultaneously.

    Different seals will offer varied trade-offs. Some may unlock all six charm sockets but provide weaker stat bonuses, while others offer powerful set synergies but limit your socket count. This creates meaningful choices for your build-do you prioritize quantity or quality of charm bonuses?

    Seals also have at least one affix roll, which can include cooldown reduction, movement speed, resistances, or other defensive or utility bonuses. These affixes further customize your Talisman and complement your charm loadout.

    Set Charms & Bonuses: How They Work

    Set charms are the key to unlocking tiered set bonuses, which activate as you equip more charms from the same set. Most sets offer 2-piece, 3-piece, and higher-tier bonuses, each providing increasingly impactful gameplay changes rather than just stat boosts.

    A prime example is the Nilfur’s Narrow Eye set, designed for Marksman builds. Its 2-piece bonus grants stacks of “Vengeance” when casting basic Marksman skills-each stack provides 6% increased movement speed and 12% multiplicative damage for Marksman skills, stacking up to five times.

    The 3-piece bonus for Nilfur’s Narrow Eye adds even more utility: while you have Vengeance, you gain one Dark Shroud shadow every two seconds, plus 25% damage reduction when you have at least one shadow. Losing a shadow also knocks back nearby enemies, adding a defensive layer to your build.

    Other sets focus on different playstyles, such as summoning all companions at once (4-piece bonus) or having companions copy your core skills (6-piece bonus). These bonuses transform how your class plays, making set charms a build-defining addition to your Talisman.

    Each set charm also has individual affixes, so even before unlocking set bonuses, they provide value. You might find a set charm that boosts skill ranks or cheap Diablo 4 materials drop rates, making them useful even in partial sets.

    How to Farm Set Charms & Optimize Your Talisman

    Set charms begin dropping in the world once you unlock the Talisman, but they are most commonly found during specific endgame activities. High-difficulty content like Torment IV+ Greater Lair Bosses, Helltide 250-cinder chests, and Slaughterhouse gambling are reliable sources of set charms.

    The Horadric Cube, returning in the Lord of Hatred expansion, also offers a way to craft or transmute set charms. While specific recipes are still being revealed, the Cube allows you to combine consumables or other items to target specific set charms, reducing the grind for your ideal loadout.

    When optimizing your Talisman, prioritize set bonuses that complement your core build. For example, a Druid focusing on companion skills would benefit from a set that enhances companion synergy, while a Sorceress using elemental skills might choose a set that boosts resistance and elemental damage.

    Don’t be afraid to mix and match sets. The Talisman System allows 2/2/2 combinations-equipping two charms from three different sets-to unlock multiple 2-piece bonuses. This hybrid approach lets you tailor your Talisman to fill gaps in your build, such as adding defense to an offensive-focused character.

    Focus on charm affixes that align with your goals. If you’re leveling, prioritize experience-boosting affixes. For endgame combat, look for resistance boosts, skill rank increases, or damage multipliers that complement your core skills.

    Key Differences from Previous Diablo Games

    Diablo 4’s Talisman and Set Charm system differs significantly from its predecessors, addressing longstanding community complaints and improving build diversity.

    Unlike Diablo 3, set items do not compete with your main gear. You no longer have to sacrifice a powerful unique weapon or armor piece to unlock a set bonus-set charms exist in a separate interface, preserving your core gear choices.

    Unlike Diablo 2, charms are not inventory-clogging items. The Talisman’s dedicated socket system keeps your inventory free for loot and consumables, while still offering the customization depth that made Diablo 2’s charm system beloved.

    Most importantly, set bonuses focus on mechanics, not massive damage multipliers. This avoids the “one best build” meta that plagued Diablo 3, keeping non-set builds viable and encouraging creativity.

    Common Mistakes to Avoid

    Even experienced players can make missteps when using the Talisman System. Here are the most common pitfalls to watch out for:

    Don’t ignore the Horadric Seal. Choosing the right seal is just as important as your charm loadout-seals with set affinities can drastically enhance your chosen set’s bonuses, so prioritize seals that align with your build.

    Don’t hoard set charms. Focus on charms that complement your build, not every set you find. Cluttering your Talisman with irrelevant set charms will waste sockets and reduce your overall power.

    Don’t lock yourself into one set. The system’s flexibility is its greatest strength-mixing 2-piece bonuses from multiple sets can create hybrid builds that are more powerful than a full single set.

    Don’t forget to socket your charms. Charms in your inventory do nothing-always socket them into the Talisman to activate their affixes and set bonuses. Double-check your Talisman tab regularly to ensure you’re using your best charms.

    Final Thoughts

    The Talisman System and Set Charms have redefined endgame progression in Diablo 4, offering a perfect blend of customization, flexibility, and build diversity. By separating set items from main gear and focusing on gameplay-altering bonuses, Blizzard has avoided the mistakes of previous titles while delivering a system that rewards strategy and creativity.

    Whether you’re chasing the Nilfur’s Narrow Eye set for your Marksman build, optimizing your Horadric Seal for maximum socket utility, or mixing sets to create a unique hybrid loadout, the Talisman System puts build control firmly in your hands.

    With patience and strategic farming, you’ll unlock the set charms and seal that best complement your playstyle. The Talisman isn’t just a new progression system-it’s a way to make your character truly unique, turning your core build into a powerful, personalized force in Sanctuary’s darkest corners.

  • MLB The Show 26: Complete Guide to Legends and Special Cards

    MLB The Show 26: Complete Guide to Legends and Special Cards

    With the launch of MLB The Show 26 approaching, excitement is building across the community as more Diamond Dynasty content is revealed. One of the biggest draws of the mode every year is the collection of legendary players and special series cards that allow fans to build dream teams combining baseball icons with modern stars.

    Here is a breakdown of the confirmed legends and special cards players can expect when MLB The Show 26 arrives.

    Diamond Dynasty Returns With More Legends

    Diamond Dynasty has become the centerpiece mode of the MLB The Show franchise. Players build custom teams by collecting cards from packs, programs, and online rewards.

    This year’s edition continues the tradition by bringing back dozens of legendary players from baseball history while also adding a few new names to the roster. According to early information, the game will feature more than 200 legends overall, combining returning icons with new additions.

    Some of the most recognizable legends already confirmed include:

    Ken Griffey Jr.
    Chipper Jones
    Roy Halladay
    Joe Morgan
    Adrián Beltré
    Jim Thome

    These legendary players will appear in multiple card series, each representing a different era or achievement from their careers.

    2nd Half Heroes Series

    One of the early card sets revealed for Diamond Dynasty is the 2nd Half Heroes series. These cards highlight players who had exceptional second halves of a season.

    Some notable examples include:

    Manny Ramirez – 94 OVR (2008 Dodgers)
    David Wright – 92 OVR (2005 Mets)
    Roy Halladay – 87 OVR (2007 Blue Jays)
    Vladimir Guerrero – 85 OVR (2008 Angels)

    These cards often feature strong offensive stats and are designed to be powerful early-game options for players building their first competitive Diamond Dynasty roster.

    All-Star Series Cards

    The All-Star Series celebrates standout performances from MLB All-Star seasons. This collection includes both legends and former MLB stars who dominated during their All-Star campaigns.

    Some confirmed All-Star cards include:

    George Brett – 91 OVR
    Andrew McCutchen – 90 OVR
    Fred Lynn – 90 OVR
    Iván Rodríguez – 89 OVR
    Joe Mauer – 89 OVR

    This series offers balanced cards that perform well across multiple attributes, making them ideal for competitive lineups early in the game cycle.

    Breakout and Contributor Series

    Several additional card categories celebrate unique moments in a player career.

    The Breakout Series highlights players during their first major breakout seasons, such as:

    Paul Goldschmidt – 90 OVR
    Ron Santo – 85 OVR

    Meanwhile, the Contributor Series honors players who made significant contributions to their teams or the sport overall.

    Confirmed cards include:

    Adrián Beltré – 91 OVR
    Carlos Santana – 83 OVR
    Larry Doby – 80 OVR

    These sets add variety to Diamond Dynasty by celebrating different aspects of baseball history.

    Jolt Series Adds Early Diamond Captains

    Another new card type arriving in MLB The Show 26 is the Jolt Series.

    These cards are designed to serve as early team captains and feature balanced stats that boost theme-team builds.

    Some confirmed Jolt Series players include:

    Billy Wagner
    Eric Gagné
    Corey Kluber
    Yu Darvish
    Adam Jones

    These cards are expected to play an important role early in the game’s lifecycle as players experiment with theme teams and synergy bonuses.

    World Baseball Classic Series Returns

    One of the most exciting card collections for MLB The Show 26 is the World Baseball Classic (WBC) Series.

    This set celebrates international baseball by featuring players who participated in the real-world tournament. Over 130 WBC cards are expected to appear in Diamond Dynasty throughout the season.

    Some of the biggest names confirmed for WBC cards include:

    Shohei Ohtani
    Fernando Tatis Jr.
    Aaron Judge
    Juan Soto
    Nolan Arenado

    These items feature unique card art inspired by the tournament and represent players from multiple countries competing on the international stage.

    Signature and Special High-Overall Cards

    For players chasing elite endgame cards, Signature Series items remain some of the most powerful collectibles in Diamond Dynasty.

    One of the biggest reveals so far is a 99 overall Signature Series card for Albert Pujols, representing his legendary 2008 season with the St. Louis Cardinals.

    Signature Series cards typically feature extremely high ratings across multiple categories, making them among the most valuable items in the game.

    Because of their rarity, these cards often command extremely high marketplace prices. Some players choose to grind gameplay modes to earn the necessary MLB The Show 26 Stubs, while others may choose to buy MLB The Show 26 Stubs to speed up roster upgrades and secure these premium cards early.

    The confirmed legends and special cards for buy MLB 26 Stubs show that Diamond Dynasty is once again packed with content for both casual players and hardcore grinders.

  • How to Get Hit by Lightning in ARC Raiders

    How to Get Hit by Lightning in ARC Raiders

    ARC Raiders is a fast-paced cooperative action game that challenges players to navigate dangerous environments, complete missions, and acquire powerful loot. Among the game’s unique mechanics is the rare opportunity to be struck by lightning, a feature that may sound hazardous but can actually lead to valuable rewards. Understanding how to get hit by lightning safely and strategically can help players access exclusive loot, craft powerful ARC Raiders Items, and improve their overall arsenal. This guide will cover everything you need to know about this unusual mechanic, including tips for preparing your loadout and why buying ARC Raiders Weapons can give you an edge.

    What Happens When You Get Hit by Lightning

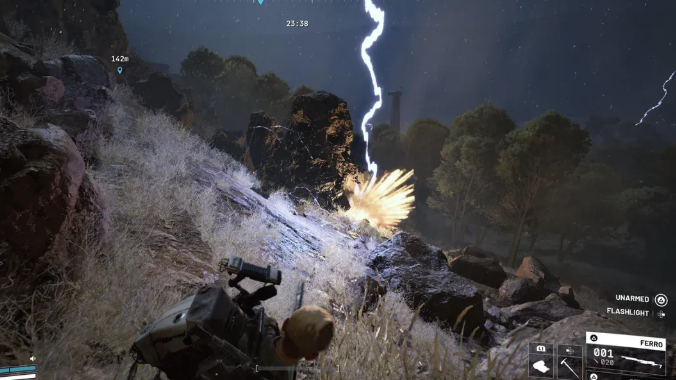
    In ARC Raiders, lightning strikes are environmental hazards that can deal massive damage if not handled properly. However, under the right circumstances, getting hit by lightning can trigger rare events or unlock exclusive loot drops. Players may find that certain high-tier ARC Raiders Items are tied to these environmental challenges, making lightning strikes an opportunity rather than just a threat.

    Lightning strikes typically occur in stormy zones or during specific mission events. These strikes are random but predictable if you understand the mechanics, making preparation essential. Players who approach lightning strategically can benefit from rare drops while minimising the risk of mission failure.

    How to Safely Get Hit by Lightning

    1. Equip Protective ARC Raiders Items: Before attempting to get hit by lightning, equip items that reduce environmental damage or improve survivability. Certain armour and shields can mitigate the damage, allowing you to survive and benefit from potential rewards.

    2. Identify Lightning Zones: Lightning is more likely to strike in specific areas or during storm events. Observing the environment and identifying safe zones for quick recovery is essential.

    3. Timing is Key: Lightning strikes are often delayed or telegraphed by visual or audio cues. Learning these cues allows you to position your character strategically and minimise risk.

    4. Use Team Coordination: Attempting a lightning strike is safer with a team. Teammates can revive, shield, or provide buffs, ensuring you survive the encounter and secure the rewards.

    Rewards from Lightning Strikes

    Successfully surviving a lightning strike can yield valuable rewards. Some high-tier ARC Raiders Items are exclusive to these events, including rare weapons, crafting materials, and specialised gear. These items often have enhanced stats or unique effects that make them highly sought-after for both combat and crafting purposes.

    Players can combine these drops with crafted gear to build a powerful arsenal. For instance, using rare ARC Raiders Items obtained from lightning events in conjunction with weapons from your inventory maximises damage output and survivability during missions.

    Why Buying ARC Raiders Weapons Helps

    While lightning strikes can provide unique items, they are random and not guaranteed to drop the gear you need. Buying ARC Raiders Weapons can supplement your inventory, ensuring you have the firepower required to handle high-level missions or environmental hazards like lightning storms.

    Investing in weapons allows you to focus on acquiring rare ARC Raiders Items from lightning events without compromising your combat effectiveness. By combining purchased weapons with event drops, you create a versatile loadout capable of tackling both standard missions and challenging environmental encounters.

    Tips for Maximising Rewards

    1. Upgrade Gear Beforehand: Make sure your ARC Raiders Items and weapons are fully upgraded to withstand the damage from lightning strikes.

    2. Use Consumables: Healing items and buffs are crucial to surviving environmental hazards. Keep them stocked before attempting to get struck by lightning.

    3. Strategic Loadouts: Equip weapons that allow you to quickly finish nearby enemies, reducing the risk of mission failure during the strike.

    4. Team Play: Lightning strikes are easier to survive with coordination. Assign team roles such as healer, tank, or damage dealer to maximise efficiency.

    5. Combine Rewards with Crafting: Use ARC Raiders Blueprints or crafting stations to upgrade or enhance items obtained from lightning events. Buying ARC Raiders Weapons ensures you have complementary gear for maximum effectiveness.

    Environmental Challenges and Combat

    Lightning strikes in ARC Raiders are part of the broader environmental challenge system, which includes hazards like Frostbite, toxic zones, and electrical storms. These challenges are designed to test your strategic thinking, positioning, and teamwork. By mastering environmental hazards, players can gain exclusive ARC Raiders Items that are otherwise inaccessible.

    For players looking to maximise efficiency, combining event drops with purchased ARC Raiders Weapons ensures you can handle both environmental hazards and enemy encounters simultaneously. This approach allows for safer experimentation with unique game mechanics, such as deliberately triggering a lightning strike.

    Final Thoughts

    Getting hit by lightning in ARC Raiders may seem dangerous at first, but with the right preparation, timing, and team coordination, it becomes a unique opportunity to collect rare ARC Raiders Items. By equipping protective gear, monitoring lightning zones, and strategically using your loadout, you can survive these events and reap the rewards.

    Additionally, buying ARC Raiders Weapons ensures you are never underpowered when attempting these risky encounters. Combining purchased weapons with event-specific drops allows you to create a fully optimised inventory, capable of handling both environmental hazards and challenging missions.

    Whether you’re chasing rare loot, crafting powerful items, or preparing for endgame content, mastering the lightning mechanic is a fun and rewarding way to enhance your ARC Raiders experience. By approaching the event strategically and investing in complementary gear, you’ll maximise rewards and strengthen your arsenal for all future challenges.

  • Diablo 4 Season 12: The Best Solo Activities for Farming Gear and Progress

    Diablo 4 Season 12: The Best Solo Activities for Farming Gear and Progress

    Solo play has always been an important part of the action-RPG experience, and Diablo 4 Season 12 continues to support players who prefer exploring Sanctuary on their own. While many endgame systems encourage cooperative gameplay, solo adventurers can still progress efficiently, collect powerful rewards, and challenge themselves through a variety of activities.

    With seasonal updates expanding the game’s systems, there are now more opportunities than ever for solo players to farm Diablo 4 Gold, obtain powerful Diablo 4 Items, and refine their builds without relying on a party. Whether you enjoy intense dungeon runs, large-scale events, or strategic endgame challenges, the game offers multiple ways to grow stronger while playing alone.

    Nightmare Dungeons: The Heart of Solo Progression

    For many players, Nightmare Dungeons remain the backbone of solo endgame progression. These upgraded dungeons use Nightmare Sigils to increase difficulty while introducing special modifiers that alter combat conditions.

    Running Nightmare Dungeons alone can be extremely rewarding because they provide consistent progression in several areas:

    High experience gains for leveling

    Reliable drops of legendary and unique Diablo 4 Items

    Opportunities to level up Paragon Glyphs

    As players push higher dungeon tiers, enemies become more dangerous, forcing them to refine their builds and strategies. This scaling system creates a natural progression loop where each successful run improves your character and prepares you for even tougher challenges.

    Because of the steady rewards and difficulty scaling, many solo players spend a large portion of their time farming Nightmare Dungeons to improve their gear and gather valuable Diablo 4 Gold.

    Helltides: Fast-Paced Farming for Loot and Resources

    Helltide events are another excellent option for players who enjoy fast-paced combat and frequent rewards. During these events, entire regions of the map become overrun by demonic forces, dramatically increasing enemy density and danger.

    For solo players, Helltides offer a great opportunity to gather:

    crafting materials

    legendary equipment

    upgrade resources

    large amounts of Diablo 4 Gold

    Defeating enemies grants special currency that can be used to open Tortured Gifts scattered across the zone. These chests contain valuable loot and often provide powerful Diablo 4 Items that can significantly improve your build.

    Since enemies spawn rapidly throughout Helltide zones, this activity also provides excellent experience gains. Players who enjoy constant action often use Helltides as one of the fastest solo farming methods in the game.

    Tree of Whispers: Efficient Rewards for Casual Sessions

    Not every player has time for long grinding sessions, and the Tree of Whispers system offers a great alternative for shorter play periods.

    This bounty-style system provides objectives such as:

    clearing dungeons

    defeating elite enemies

    completing world events

    finishing specific map activities

    Completing these tasks earns Grim Favors. Once enough favors are collected, they can be turned in for reward caches that contain gear, crafting materials, and sometimes valuable Diablo 4 Items.

    For solo players, this system is particularly convenient. You can choose which objectives to complete and progress at your own pace, making it a flexible way to earn rewards and accumulate Diablo 4 Gold without committing to lengthy endgame runs.

    Strongholds: Immersive Solo Challenges

    Strongholds are some of the most memorable encounters in Diablo 4. These corrupted locations are filled with dangerous enemies and powerful bosses that must be defeated to reclaim the area.

    Clearing a Stronghold provides several benefits:

    permanent changes to the surrounding region

    access to new dungeons or waypoints

    valuable gear and resource rewards

    Strongholds feel almost like mini story missions, offering unique mechanics and environmental storytelling that enhance the overall experience. Many players consider them one of the most enjoyable solo activities in the game.

    In addition to their narrative appeal, Strongholds can also reward useful Diablo 4 Items and provide a satisfying sense of accomplishment once completed.

    The Pit: A True Test of Build Strength

    For players who want to push their characters to the limit, The Pit offers a challenging endgame activity designed to test build efficiency and skill.

    The objective is straightforward: clear enemies quickly and defeat the final boss before time runs out. As you progress through higher tiers, enemy strength increases dramatically, forcing players to optimize their builds and strategies.

    Solo players often run The Pit to:

    test new character builds

    measure damage output and survivability

    farm high-end materials

    Successfully completing higher tiers can reward powerful Diablo 4 Items and additional resources, making it a valuable activity for players focused on maximizing their character’s power.

    Fields of Hatred: Risk and Reward for Solo PvP

    Although Diablo 4 includes PvP zones, they can still be enjoyable for solo players. The Fields of Hatred allow players to collect Seeds of Hatred by defeating enemies throughout the area.

    These seeds can then be converted into currency used to obtain rewards. However, other players can attack you at any time, adding a layer of tension and excitement.

    Some solo players enjoy using stealthy strategies in these zones. By farming enemies quickly and carefully avoiding other players, you can collect valuable rewards and gather extra Diablo 4 Gold before escaping.

    The risk-versus-reward dynamic makes these areas unpredictable and exciting compared to standard PvE content.

    Why Solo Play Thrives in Diablo 4

    Even though Diablo 4 supports cooperative gameplay, it remains highly accessible for solo adventurers. With the right build and strategy, players can complete nearly every type of content without relying on teammates.

    Solo players can still:

    push high-tier Nightmare Dungeons

    complete seasonal objectives

    farm powerful Diablo 4 Items

    collect large amounts of Diablo 4 Gold

    Many players actually prefer the solo experience because it allows them to experiment with builds, explore Sanctuary freely, and progress at their own pace.

    As new seasonal updates continue to expand the game, Diablo 4 remains an excellent choice for players who enjoy challenging content without the need for constant group play.

    From Nightmare Dungeons and Helltides to Strongholds and The Pit, Season 12 offers plenty of ways for solo players to grow stronger while exploring the dark and dangerous world of Sanctuary.

  • Diablo 4 Season 12 Guide: Best Builds for Every Class

    Season 12 of Diablo 4 is here, and if you want to hit the ground running, choosing the right build is crucial. Whether you’re looking to optimize your gameplay or buy Diablo 4 Gold to get a head start, here’s a breakdown of the top builds for each class, optimized for both speed and efficiency, along with estimated Pit tiers and playstyle tips.

    1. Paladin: Orian & Thorns Builds

    Top Recommendation: Orian Build

    · Pit Tier Estimate: 120+

    · Playstyle: Walking simulator, extremely fast at clearing content, smooth for kill streaks.

    · Weapon: Two-handed axe (updated from one-handed + shield).

    Why Play It:

    Orian dominates in all forms of content this season due to its efficiency in holding kill streaks, walking through objectives, and obliterating enemies without complicated combos. If you want the fastest, most chill Paladin experience, this is it.

    Alternative: Shieldthrowing Thorns Build

    · Pit Tier Estimate: 120+

    · Playstyle: Button-light, casual-friendly, damage comes from throwing your shield rather than taking hits.

    Why Play It:

    · Great for players who want high damage without constantly spamming abilities. A chill, effective build for solo or group play.

    Other Notes:

    · Judgment Paladin is still playable but feels clunky due to slower application.

    · Wing Strikes are solid but not as popular this season.

    2. Druid: Pulverized Build

    · Pit Tier Estimate: 124

    · Playstyle: Hit-once, high-damage, minimal button-pushing.

    · Skills: Pulverize is the core, but you can shapeshift into Werewolf for bonuses in higher-tier content.

    Tips: Overlap poison puddles for optimal damage in high-tier fights. Very similar gameplay to previous seasons.

    3. Barbarian: Hoda (Hammer of Ancients)

    · Pit Tier Estimate: 129

    · Playstyle: Slam-heavy, satisfying one-hit clears, moderate button-pushing.

    Tips:

    · Group enemies for maximum effect.

    · Wrath of Berserker + triple shouts are useful for low-tier speed content.

    · Hoda is one of the top-tier classes for Pit pushes, open world, and general farming.

    · Alternative: Lunging Strike is viable but situational.

    4. Necromancer: Golem Build

    · Pit Tier Estimate: 115–116

    · Playstyle: Tanky, autonomous damage via summoned Golems, keeps kill streaks going.

    Why Golem:

    Compared to Shadow Blight, the Golem build slightly favors sustained kill streaks due to passive damage and higher survivability. Ideal for XP farming and Tormented 4 content.

    5. Rogue: Heartseeker & Dance of Knives

    1.Top Pit Tier: 125 (Heartseeker with Orphan Maker)

    2. Playstyle: Fast, high single-target damage, skill-intensive.

    3. Alternative: Dance of Knives

    4. Great for speed farming in open world content.

    · Lower Pit tier compared to Heartseeker.

    · Casual-friendly for T4 content and kill streak XP.

    Note: Heartseeker may feel clunky for casual players but excels in Pit push ranking.

    6. Sorcerer: Crackling Energy

    · Pit Tier Estimate: 119

    · Playstyle: Fast, energy-based spam, highly mobile.

    · Optional Variant: Ice Shards + Halo Verglass for maxed-out damage (for leaderboard players).

    Tips: Focus on kill streak maintenance, especially in Infernal Horde and Hell Tide content. Avoid overcomplicating with niche builds unless ranking top-tier is your goal.

    7. Spirit Born: Payback

    · Pit Tier Estimate: 126

    · Playstyle: Active, ultimate-heavy, jump-in playstyle.

    · Strengths: Fast, top-tier Pit pusher, strong even without Mythic items.

    Tips: Always maintain buffs and ultimates; highly engaging for players who enjoy active gameplay.

    Season 12 Overview

    · Top Classes (Pit Tier Focus):

    1. Barbarian (Hoda) – 129

    2. Spirit Born – 126

    3. Rogue (Heartseeker) – 125

    4. Druid (Pulverized) – 124

    5. Paladin (Orian/Thorns) – 120+

    6. Sorcerer (Crackling Energy) – 119

    7. Necromancer (Golem) – 115

    · Key Notes:

    1. All builds can clear Tormented 4 content comfortably.

    2. Kill streak maintenance is crucial in Season 12.

    3. Bloodied items may impact build rankings; updates may adjust strategies.

    Quick Tips for Season 12

    · Stick with Orian for Paladin if unsure.

    · Use Pulverize Druid and Hoda Barbarian for high Pit-tier progression.

    · Maintain kill streak chains to maximize XP bonuses.

    · Choose casual-friendly builds (Thorns Paladin, Dance of Knives Rogue) for T4 content farming.

    · Adjust for personal playstyle: button-heavy vs chill “walk-through” builds.

    This guide provides a clear roadmap for your Season 12 Diablo 4 journey. Whether you’re grinding Paragon points, clearing Hell Tides, or pushing Pit levels, these builds will ensure you have an optimized, fun, and efficient experience. For players looking to get ahead, you can also buy cheap Diablo 4 Items safely and quickly through MMOEXP, giving you the resources to enhance your characters and dominate the season.

  • ARC Raiders Season Reset Guide: How to Start Your Expedition Efficiently

    ARC Raiders Season Reset Guide: How to Start Your Expedition Efficiently

    Starting a fresh Expedition in ARC Raiders can feel intimidating, especially after a full seasonal reset. Your stash is empty, your blueprint library is limited, and basic resources like healing items and crafting materials are in short supply. While the temptation to jump straight into PvP fights is strong, experienced players know that the early phase of a wipe is all about preparation.

    Building a stable foundation early will make the rest of the season dramatically easier. By focusing on smart raid objectives, efficient farming routes, and long-term progression systems, you can quickly accumulate valuable ARC Raiders Items and establish a strong economy.

    This guide explains the smartest way to begin a new Expedition, covering raid planning, quest priorities, material farming, Scrappy upgrades, and skill tree development.

    Decide Your Raid Objective Before Deploying

    The most important decision in ARC Raiders happens before you even enter the map.

    Every raid should have a clear objective. Ask yourself:

    ·Am I looting?

    ·Am I completing quests?

    ·Am I farming crafting materials?

    ·Am I hunting players?

    Early in the season, discipline is critical. Most players start with:

    ·Weak or incomplete blueprints

    ·Limited healing supplies

    ·Very few backup gear kits

    ·Minimal Space Dollars

    Because of this, chaotic gameplay can quickly lead to unnecessary losses.

    If you deploy with the goal of looting, focus on gathering resources and extracting safely. If you deploy for quests, prioritize the required objectives instead of chasing fights across the map.

    Many players lose valuable quest items after engaging in unnecessary PvP encounters. Dying with rare materials or mission items can easily cost hours of progress, especially when certain objectives require multiple raids to complete.

    The smartest approach is simple: set a goal and stick to it.

    Why Completing Story Quests Early Matters

    Technically, story quests are not required to participate in Expeditions. However, finishing them early provides significant long-term advantages.

    Completing the main Expedition storyline rewards players with several powerful blueprints, including:

    ·Trigger Grenade Blueprint

    ·Lure Grenade Blueprint

    ·The Cracker Blueprint

    ·Braleta Blueprint

    These tools are incredibly useful in both PvE and PvP encounters. Grenades can control enemy ARCs, manipulate player positioning, or create escape opportunities during dangerous fights.

    In addition to blueprints, story quests also provide extra resources and progression benefits that make future raids easier.

    Some players choose to buy ARC Raiders Blueprints later in the season to speed up crafting progression, but completing story quests early ensures you already have a strong foundation without relying entirely on external trading systems.

    Money Runs: The Backbone of Progression

    Space Dollars are one of the most important currencies in ARC Raiders. Without a healthy bank balance, your ability to gear up for future raids becomes severely limited.

    A strong economy allows you to:

    ·Purchase weapons like the Renegade

    ·Stock up on healing items

    ·Buy smoke grenades for safer extractions

    ·Pay entry costs for certain Expeditions

    For this reason, experienced players often dedicate several early raids entirely to money runs.

    Popular strategies include:

    ·Trinket farming routes in Buried City

    ·Zero-to-hero runs in Stella Montis

    ·Minimal gear runs focused on safe pocket storage

    These low-risk raids focus on consistent extraction rather than combat. Even modest profits can accumulate quickly if you prioritize survival.

    Over time, these runs create a financial cushion that allows you to play more aggressively later in the season.

    Frontload Your Material Farming

    Another critical early-season strategy is material stockpiling.

    Crafting is essential in ARC Raiders, and running out of resources during an important raid session can be incredibly frustrating. To avoid this problem, start gathering crafting materials immediately after the reset.

    Important materials include:

    ·Seeds

    ·Fabric

    ·Metal parts

    ·Mechanical components

    ·Electrical components

    ·Advanced electrical components

    Whenever possible, recycle unwanted gear and resources. Recycling provides valuable components that can later be used to craft healing items, equipment, and other useful ARC Raiders Items.

    Nothing disrupts a successful PvP night faster than realizing you cannot craft a single bandage. Frontloading materials ensures you always have the supplies needed for extended play sessions.

    Upgrade Scrappy as Early as Possible

    Scrappy is one of the most overlooked progression systems in ARC Raiders, especially among new players.

    However, upgrading Scrappy early provides huge long-term benefits.

    Higher Scrappy levels increase passive material returns and can even recover additional items after failed raids. This means you continue gaining value even when a raid goes poorly.

    Scrappy becomes particularly valuable during sessions where you:

    ·Focus heavily on PvP

    ·Attempt boss fights like the Queen

    ·Experience multiple gear losses

    Even when your raids go badly, Scrappy continues generating resources in the background.

    Investing in Scrappy upgrades early ensures you maintain steady resource generation throughout the entire season.

    Plan Your Skill Tree Carefully

    Skill points are limited early in the wipe, which makes skill tree planning extremely important.

    Before investing points, decide what type of playstyle you want to develop.

    Ask yourself:

    ·Do I prefer PvP combat?

    ·Do I want to focus on PvE farming?

    ·Do I value survivability over aggression?

    Many experienced players share their builds online, providing useful templates for different playstyles. Some builds emphasize mobility and combat efficiency, while others prioritize defensive bonuses and resource efficiency.

    The key is consistency. Avoid randomly spending skill points without a clear plan.

    When your skill tree supports your raid objectives, your character becomes significantly more effective as the season progresses.

    The Importance of Early PvP Discipline

    This guide does not suggest avoiding PvP entirely. Player combat is one of the most exciting aspects of ARC Raiders.

    However, early-season PvP should be approached carefully.

    Once you have:

    ·Built a healthy Space Dollar reserve

    ·Stockpiled crafting materials

    ·Upgraded Scrappy

    ·Completed major story quests

    ·Developed your skill tree

    You can confidently engage in more frequent PvP fights without risking major progression setbacks.

    Playing cautiously early in the season gives you the freedom to play aggressively later.

    Final Thoughts

    The smartest way to start a new Expedition in ARC Raiders is to focus on long-term stability rather than short-term excitement.

    Successful players prioritize:

    1. Setting a clear raid objective.

    2. Completing story quests early for blueprint rewards.

    3. Running consistent money farming routes.

    4. Stockpiling crafting materials.

    5. Upgrading Scrappy as soon as possible.

    6. Planning their skill tree carefully.

    By following these strategies, your stash will quickly fill with valuable ARC Raiders Items, your blueprint library will expand, and your in-game economy will stabilize.

    Whether you unlock everything through gameplay or choose to buy ARC Raiders Blueprints to accelerate your crafting progression, establishing a strong early foundation is the key to dominating the season.